
A custom metal rolling tray might seem like a simple printed product but producing one repeatedly at wholesale scale is more than just printing artwork on a finished tray.
Before the artwork is prepared, the tray structure must be confirmed. The printing technique should be suitable for the visual effect the brand wants to achieve. The colors need to be adjusted for a reflective metal surface and the printed sheets need to survive cutting, stamping, forming, coating, packing and international transportation without compromising their intended appearance.
For wholesale buyers, knowing this process helps to reduce design mistakes, sampling delays, unexpected color differences and quality problems during mass production.
This guide takes you through the process of taking a custom metal rolling tray from initial design concept through to finished wholesale product. Topics covered include material selection, artwork preparation, printing, forming, finishing, inspection and export packing.
Many buyers will start a custom rolling tray project by sending their logo or finished graphic to the supplier.
The initial decision will be the physical tray structure in practice.
The dimensions of the artwork depend on the tray size, corner radius, edge height, forming depth, and whether the product is open or has a magnetic lid. If a design is created without the proper production template, important text or logos could be placed within curved areas that will become distorted when formed.
The buyer and manufacturer must agree on tray dimensions, tinplate thickness, mould, print areas, backside requirements, surface finish, packaging format and the total quantity for each design before artwork commence.
Once these specs are set, the manufacturer can give you an exact dieline to create your artwork.
The order is important here:
Structure first. Second artwork. Then printing and manufacturing.
Tinplate is a popular material for custom metal rolling trays due to its ability to be printed on, formed, stacked, and sold at a reasonable wholesale price.
But not all trays are equal. Material thickness: affects rigidity, forming stability, weight, cost, and perceived retail quality.
| Tinplate thickness | Typical positioning | Main characteristics | Recommended applications |
| 0.28 mm | Cost-sensitive or promotional | Lightweight and economical; structure and forming depth must be planned carefully | Promotional projects, high-volume giveaways and entry-level retail collections |
| 0.32 mm | Standard wholesale retail | Balanced combination of cost, rigidity and product feel | Most medium-sized custom rolling trays and regular private label programs |
| 0.35 mm | Premium retail or gift positioning | More substantial hand feel and stronger shelf presence | Magnetic lid trays, premium collections, gift sets and higher retail price points |
Not every project calls for heavy-duty material. A good performance can be obtained from a small tray with steady corners and enough forming depth with 0.23 mm or 0.25 mm tinplate.
A larger, shallower, tray may need to be specified thicker or with stronger structural details to reduce flex.
Material thickness should therefore be selected in conjunction with tray size and mold structure, not as a separate specification.
The tinplate is still flat when the custom metal rolling tray is printed. The printed sheet is then cut and shaped into the final tray shape.
Thus the finished artwork cannot be just the size of the visible flat area of the tray. It must also include the material that will extend into the sides, corners, rolled edges and forming areas.
Typically, the manufacturer’s dieline will show the finished visible area, bleed area, safe area, forming lines, corner zones and cutting references.
Keep important logos, product names, and small text within the safe area. Decorative backgrounds may run out to the bleed area; detailed elements should not be placed too close to corners or deeply formed edges.
Although a design may appear centered on the computer screen, it may appear offset when the metal is stamped. Experienced artwork preparation anticipates movement before printing begins.
Vector artwork is usually preferred because logos, typefaces, lines and decorative elements can be scaled up or down without losing clarity.
Commonly accepted formats are AI, editable PDF, EPS, CDR and high res PSD files. Fonts need to be converted to outlines, linked images need to be embedded and important graphics need to be of a sufficient resolution.
The artwork must clearly show CMYK areas, Pantone colors, metallic-effect areas, embossing positions, glow-in-the-dark elements and any artwork needed on the back of the tray.
If these details are combined into one flattened image, factory may not be able to separate them correctly in prepress preparation.
buyers also need to check they own or have permission to use any logos, illustrations, photos, characters and design elements. Manufacturing capability does not translate into intellectual property rights.
If you want full-color designs on a rolling tray, your best bet is to go with CMYK printing.
Good for illustrations, gradients, photographic imagery, artistic backgrounds, multi-color patterns and sophisticated lifestyle graphics. CMYK provides enough flexibility that brands that need multiple coordinated designs can create visual variety while still maintaining a consistent overall style.
But CMYK colors on a monitor will not be exactly the same when they are printed on metal.
Screens produce color by the use of light . Printed tinplate reflects light from its environment via layers of ink and coating . The natural silver tone of the metal, the use of white base ink, the surface varnish and the lighting conditions all affect the final appearance.
As such, buyers should use the digital mockups as a guide for layout purposes only and not as an exact guarantee of color.
Spot colors from Pantone are often used when there is an important corporate color or large area of solid color in a project.
They can give you more controlled color direction than building the same shade entirely in CMYK. Pantone colors are especially useful for logos, minimalist designs, large solid backgrounds, and private label collections that require consistent branding across multiple products.
CMYK and Pantone colors can be blended.
A tray can be done in CMYK for the main art and a Pantone colour for the logo or border. It allows for creative freedom while maintaining greater control over core brand elements.
Pantone references are still to be converted to the actual metal and coating system. The Pantone code printed on tinplate may not look the same as the same code printed on paper, fabric or plastic.
One of the key decisions to be made when metal printing is whether the design will be printed on a white base or not.
Tinplate is naturally a shiny silver surface. If you print colored ink directly over that surface, the metal reflection can still shine through and alter the way the color appears.
A white base layer cuts down on this reflection, making colors appear brighter, more solid, and similar to traditional paper printing.
Printing on a white base is usually used for pastel graphics, clean backgrounds, detailed illustrations, product photography and artwork requiring a higher degree of color accuracy.
The tinplate is used differently in metallic effects. In some areas no solid white base is laid down and the natural metal peaks through the transparent or semi-transparent ink.
It can be used to create reflective lettering, metallic highlights, silver decorative lines, vintage metal effects and more visual contrast.
Artwork file must clearly distinguish between white-base areas and metallic areas. If the decision is not made until production, the final product may not be the same as the original design concept.
Back-side print is sometimes neglected as the front side surface gets the most visual attention.
But the back can have a logo, website, product info, care instructions, barcode, collection name, legal info or a smaller continuation of the main artwork.
Back printing is useful for private label retail products to keep a cleaner front design and still allow for brand identification.
Planning should take place before production as it may require additional printing alignment, coating, and handling. Reintroducing printing after the main production plan is approved may impact cost and lead time as well.
The surface coating protects the printed artwork and is important in the final product appearance.
Finishes can change a design to feel energetic, understated, premium, playful or collectible.
| Finish or effect | Visual result | Main consideration | Best suited for |
| Glossy varnish | Brighter colors and stronger reflection | Fingerprints and surface reflections may be more visible | Bold graphics, colorful retail collections and promotional products |
| Matte varnish | Softer reflection and a more restrained appearance | Dark matte surfaces may show scratches more clearly if poorly packed | Premium, minimalist and lifestyle-focused designs |
| Metallic effect | Natural tinplate reflection remains visible in selected areas | Artwork must clearly define white-base and transparent areas | Logos, borders, highlights and vintage metal graphics |
| Embossing or debossing | Adds raised or recessed tactile details | Printing and forming positions must align accurately | Logos, central icons and premium brand details |
| Glow or specialty ink | Creates a distinctive visual effect under specific lighting | Usually increases process complexity and requires physical sampling | Limited editions, themed collections and promotional launches |
| Raised 3D effect | Produces stronger tactile depth and visual impact | Fine artwork details may need simplification | Premium graphics and statement products |
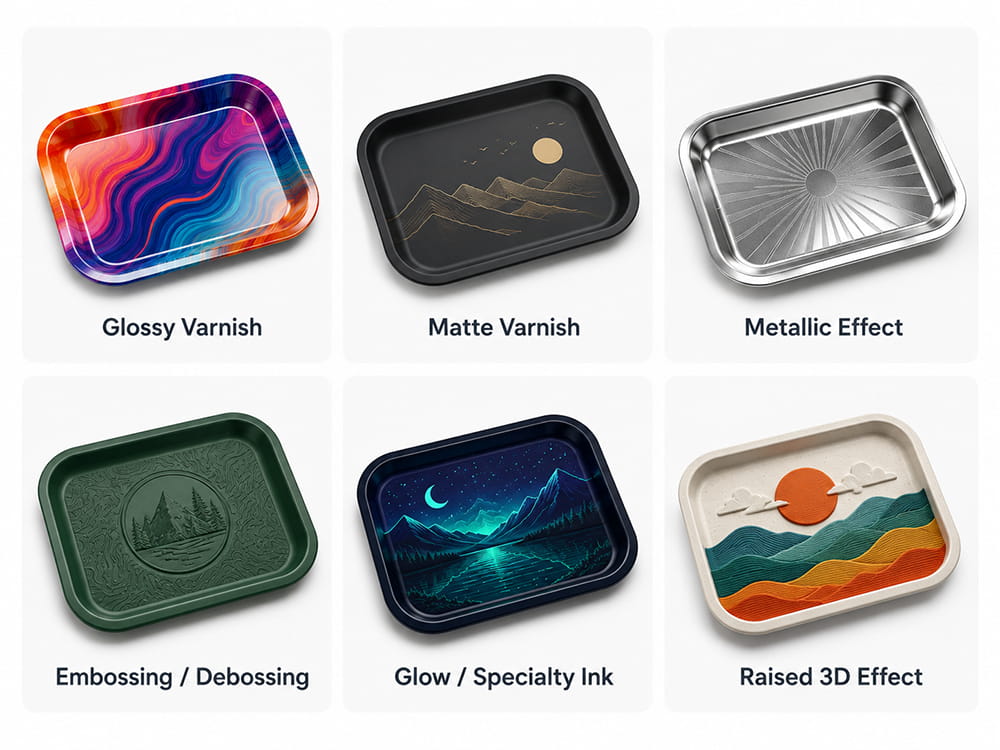
Not every decorative effect available needs to be used in a project.
The best finish is often the one that supports the art and target price rather than competes with them. A clean matte design with one metallic logo can be more premium than a tray using multiple unrelated special processes.
Embossing and debossing can add value to a custom rolling tray but require close coordination between the art work and the production tooling.
Once the metal sheet has been cut and formed, the embossed area must match the printed logo or graphic. Small positioning errors become more apparent when a printed line and raised shape do not match.
Deep embossing is not typically a good option for fine text, thin lines and highly detailed illustrations. The more dependable choices are simple logos, icons, borders and larger graphics.
The depth also counts. A subtle embossed logo adds a refined tactile effect, but too much depth can impact stacking, surface flatness, or the look of adjacent printed areas.
This is why embossing needs to be the part of the artwork development, not added in after the design is complete.
Once the artwork is approved the manufacturer will prepare it for metal printing.
This step can include checking dimensions, converting colors, separating CMYK and Pantone layers, defining white ink, marking metallic areas, creating embossing references and arranging the designs on the printed tinplate sheet.
The position of each tray on the sheet must be consistent with the subsequent cutting and forming processes.
That is the place where factory experience counts. Metal art is more than just something to look at. It must also be able to handle cutting tolerances, sheet utilization, forming direction and production efficiency.
If several artworks are part of one order, the manufacturer has to plan the printing, identification, sorting, packing and inspection of the artworks separately as well.
A digital mockup can be useful to check out layout, proportions, logo placement and general design direction.
This is not a true representation of the finished metal tray.
A computer rendering cannot reproduce the reflection of metal, the transparency of ink, the gloss of a coating, the depth of an emboss, the distortion of an edge, or how colors change under different light.
For basic projects, a digital mockup may suffice to confirm the design before sampling. A physical printed sample is highly recommended for premium products, critical Pantone colors, metallic effects, embossing, glow printing or magnetic lid sets.
The sample serves not only to prove whether the design is attractive. It should also examine structure, color direction, edge feel, coating, alignment, lid fit, stacking and packaging.
After prepress preparation the artwork is transferred to flat tinplate sheets on the printing system.
Depending on the design, the sheet may be coated in white first. Then the approved production plan is followed to apply CMYK colors, Pantone inks, transparent colors and protective varnish.
Each layer needs to be properly dried or cured before the next layer is applied.
Insufficient curing can lead to ink transfer, surface sticking, coating damage or colour contamination when stacking sheets. Flexibility during the forming process can be affected due to over-cure or improper processing.
The printed surface must be stable enough to withstand cutting and stamping without cracking or delaminating in curved areas.
This is one of the reasons that metal packaging printing is different from paper printing from the aspect of process control.
After printing and curing, the tinplate sheets are cut into individual blanks on the tray layout.
Cutting accuracy influences the position of the artwork on the finished product. If the blank moves, a centered design may appear closer to one edge after forming.
The factory should control the cutting dimensions and the orientation of each blank.
This is particularly important where the artwork has borders, symmetrical arrangements, center logos or graphics that are designed to continue from the base into the tray sides.
Simple full-background artwork handles slight movement better than highly geometric designs.
The cut metal blanks are fed into the forming machinery and pressed into the final shape of the tray.
This is the stage for the base, sides, corners, edge height and rolled rim.
In forming the metal stretches and bends. The original dieline includes forming allowances because artwork near curved corners may be slightly compressed or expanded.
The corner symmetry, surface flatness, edge smoothness, stacking performance and the overall feel of the product are attributed to the quality of the mold and the forming control.
A good tray will sit evenly, have consistent corners, and provide a smooth rolled edge without any sharp points.
The surface should not exhibit excessive wrinkling, cracking, coating damage or obvious distortion.
The edge of a rolling tray is both a safety and a structural feature.
A good rolled edge gives a smoother hand feel and better stiffness around the perimeter. It also contributes to the finished look of the product.
Inconsistent edge forming may cause rough areas, uneven height, distorted corners or visible differences between trays.
For wholesale projects it is advisable to check the edge quality over the whole production batch, and not only on the first sample.
No matter how nice the print side looks, it can't compensate for a badly made or uncomfortable edge.
The magnetic lid tray involves more production steps than the regular open tray.
The tray and lid must be made as matched components. The size, corner radius, artwork position and finish must be the same visually, structurally and functionally.
The magnets should be snug enough to keep the lid in proper alignment but not so snug that the lid is hard to remove. The printed lid should lay flat and protect the tray surface when not in use.
The factory also has to consider if the lid will be printed on the outside only or on both sides. Coordinated interior printing may improve the opening experience, but it also means one more step in design and production.
Thetray and lid may rub against each other in transit and therefore require more protective packaging. Individual wrapping, tissue, sleeves or other suitable separators can reduce scratching.
Products with magnetic lids typically take longer to assemble, inspect and package than open trays.
Quality should be checked in terms of appearance and functionality.
Color consistency is one important piece, but it's not the only piece. The factory shall also check the printing alignment and coating quality, surface scratches, forming stability, corner shape, rolled edges, tray flatness, stacking and packaging protection.
Magnetic lid models: Check lid alignment and magnetic hold as well.
A good inspection process is one that compares production units to the approved sample or signed reference, not just a general visual judgment.
Color tolerance is reasonable in mass printing. A buyer should know that. The point is consistent control in the approved production standard, not absolute identity under all lighting conditions.
In painting, artwork distortion occurs frequently when vital details are situated too close to developing areas. A colour disappointment may occur when one approves a screen image without taking into account the white base, metal reflection or final varnish.
Finished trays frequently scratch each other when they are stacked, sorted or transported. Incorrect dielines, cutting movement or insufficient allowance for forming can cause out-of-register graphics.
If a thin material is chosen for a large, shallow tray without adequate structural support, the product may feel flexible or light.
Most of these problems can be avoided before entering mass production. Usually it is more expensive to correct a full order after it has been manufactured than to take accurate specifications and physical samples.
Finished trays stack naturally, which helps reduce export volume. However, if the products are packed without sufficient protection, then direct metal to metal contact can damage printed surfaces.
Basic bulk packing may be tissue or thin protective sheets, or wrapped in groups between stacks. Each polybag provides better protection from dust and light scratching.
Retail projects may use paper sleeves, individual cartons, window boxes or full gift packaging. Many magnetic lid products need extra protection to stop the lid and tray rubbing against each other during shipping.
The master carton must be durable for long distance handling and should not allow excessive movement within the box.
Packaging is not unrelated to product quality. A tray that comes scratched is a failed customer experience if it’s manufactured correctly.
Standard custom rolling tray sample usually takes 7-10 days after structure, artwork, printing method and finish are confirmed.
Mass production generally takes between 25 and 35 days, depending on order quantity, design numbers, surface processes, magnetic lid assembly, packaging and production schedule.
Projects may require additional lead time for new molds, special finishes, complex color approval or custom gift packaging.
Buyers can minimize delays by confirming the full specification before sampling and by avoiding major artwork changes once the printed sample has been approved.
When the manufacturer has all project information, they can provide a more accurate quote.
The enquiry should also specify the tray size required, the thickness of the tinplate preferred, whether the lid should be open or magnetic, the total order quantity, the quantity per artwork, the printing requirements, the surface finish, the packaging format, the destination country and the expected delivery schedule.
Even if you don't have the final design you want, artwork files or reference images are also helpful.
A request for only “the price of a custom rolling tray” cannot provide a reliable quote because there are too many manufacturing variables that are not defined.
Another common mistake is creating the final artwork before selecting the tray mold. This often leads to more re-design work if the image does not fit the actual forming template.
Another is choosing special effects without regard to how they support the brand or the retail price. Embossing, metallic printing and glow ink can add value, but also add cost and approval steps.
Another risk is that of approving colour simply from a monitor. Where brand colours matter buyers should ask for a printed sample or a clearly agreed physical colour reference.
Also, breaking one order into too many smaller amounts of artwork can create complexity. Is the MOQ for the whole order or for each design? The buyer needs to confirm.
Last but not least, wholesale buyers should not only compare quotations by unit price. Tinplate thickness, print coverage, back print, varnish, packing method, sample type, and export carton quality can differ widely between suppliers.
Most full color graphics can be printed. Artwork must be adapted to the tray dieline and forming zones. Near corners and edges fine detail may need to be moved or simplified.
CMYK is best for detailed multi color artwork, photos and gradients. Good for important brand colors. Good for big solid blocks. Pantone printing. Many projects are using both methods.
Tinplate printing is ink, metal reflection, a white base, varnish, and ambient lighting. Computer screens rely on light emission. A printed physical sample is a more reliable reference.
Yes . Artwork areas may be chosen for transparent printing or to omit the white base for metallic reflective effects.
Yeah. The surface of the visible tray, outer back and magnetic lid surfaces are printable, depending on the product design and production plan.
Sure. The embossed position should be consistent with the printed design, and very fine detail may not reproduce well. Embossing should be considered when preparing the artwork.
0.25 mm is good for most of the standard wholesale projects. Cost-sensitive orders can be supported by a 0.23 mm tray while 0.28 mm is often used for premium products. Size and structure also determine the right choice.
Ideal for key brand colours, metallic effects, embossing, glow printing, premium positioning and magnetic lid projects.
Standard samples usually take 7-10 days. Mass production usually takes about 25-35 days after sample and artwork approval.
The manufacturing of custom metal rolling trays is a connected process.
The material has an effect on the structure. The structure dictates the dieline. The dieline dictates the artwork. The plan for printing and finishing will depend on the artwork. Then printing has to survive cutting, forming, inspection, packing and international shipping.
Provided that these choices are made in an appropriate order, the end tray can deliver good branding, consistent quality and repeatable wholesale production.
The best projects are not started on the most complicated art work or the least unit price. They start with a clear specification and realistic understanding of printed metal manufacturing.
For private label brands and wholesale buyers, that knowledge of manufacturing turns a great-looking design into a product you can sample, produce, reorder and sell consistently.
Printing is not an ornament, It’s product value.

Obtenha as últimas informações e ofertas especiais


 Rede IPv6 suportada
 Português
 English
 Français
 Deutsch
 Español